What to Wear in Tulum: The Packing List

What to Wear in Tulum: The Packing List

If you’re sitting in front of an empty bag wondering what on Earth to wear on your trip to Tulum, this article has got you covered. Beach destinations are always challenging because they involve sand, water, and heat. Those three elements call for an entirely different wardrobe — especially if you live in a cold city to begin with.  Even if you do live in a city with hot weather year-round, there’s a high chance you’re not normally concerned with how fast your clothes dry up or whether they’ll take dirt gracefully. See? I told you. 🙂

What to Wear in Tulum

What you’ll find below are my recommendations as far as what to wear on your next trip to Tulum and how to style each piece to have the most comfortable, exciting, and (why not!) fashion-forward stay possible.

Pin This For Later

Shorts & Other Bottoms

Shorts are a no-brainer for hot climates, but I do have a few suggestions around the types of shorts that you’ll want to bring with you. To begin with, avoid thick denim because it just adds to the heat you’ll experience anywhere in the Caribbean. Go for thinner fabrics and looser fits. Something about 100°F just makes clothes feel stickier, and pants that are too tight just make the entire thing worse. These “mom shorts” by Urban Outfitters are retro, comfortable, and flexible at the same time.

Color-wise, I suggest sticking to blacks, browns, greens, and denim. White shorts are some of the most unpractical items to pack for a trip to… anywhere really. I am not just saying this because an entire bottle of Mezcal broke inside our bag and my husband’s white bermudas got horribly stained. I am not even saying this happened. But if you think there’s a chance it did, and there’s a chance it could happen to you too, avoid all-whites.

Now, if you’re more of a skirt type of person, the loose fit advice remains. Go for wrap-around skirts that can be easily turned into cover-ups. Versatility is incredibly important when you pack for beach trips. Because you’ll (hopefully!) be jumping from restaurants to streets to shorelines all day, you’ll find that flexible garments are priceless.

Swimming Suits and Cover-Ups

Swimwear is where you’ll know exactly what suits you best. As long as it is made with light Lycra, highlights the best parts of your body, and doesn’t cause awkward tan lines, go for the style you like best. I do have one suggestion that will make your suit a bit more versatile for all those events we just talked about: bring at least one piece that can double as a shirt. This is probably the weirdest recommendation you’ve read, but I found that the one swimming suit I could wear with high shorts or a high-waist skirt was, by far, the one I wore the most. It dried up quickly, looked tropical, and still allowed me to catch some sun — this garment just got the work done.

Swimwear Mexico

The one swimming suit I wore a million times

Blouses, Dresses, and Tunics

This leads me to tunics. Those laid-back, light mini dresses that you could spend days wearing. Take this advice from someone who lives and works in 100°F weather over 200 days/year: beach-to-city is what you want to aim for. Forget day-to-night, the type of garment you need is something that will dry up fast enough to let you catch that reservation within an hour. Don’t assume that you’ll have time to change clothes before you hit the next stop on your trip, and please don’t add that kind of pressure to your itinerary. Instead, try to find pieces that can transform with a few changes here and there.

This simple tunic by Revolve is a great choice.

Lastly, and this advice goes for every single thing you pack: avoid clothing that needs to be ironed aka wouldn’t look great while entirely wrinkled. Just do it.

Accessories for Tulum

But how can you create that whole beach-to-city look without carrying an entire new outfit in your bag? Accessories are the answer. Headpieces like bandanas and jewelry can get you there in 5 minutes. Let’s look at a few ways to do this.

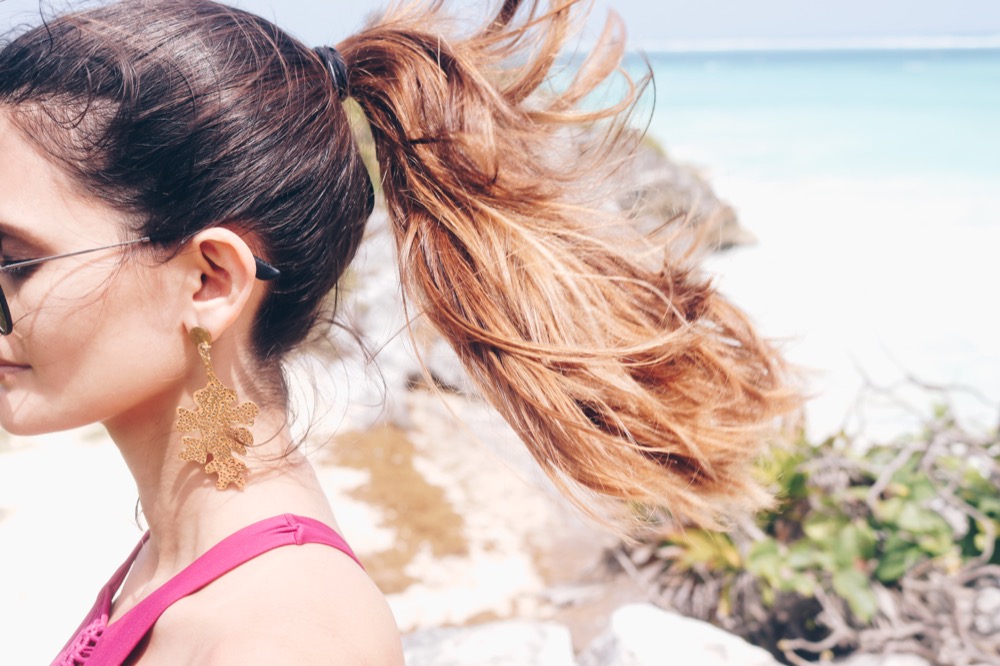
Statement earrings that can get wet

I brought all four earrings in the Nostalgiosity Tulum Collection and enjoyed alternating them during the entire trip. Since they are made of gold-plated bronze, they’ll take a significant amount of humidity and sand without losing shine. You can always take them off while diving into the water and put them back on for some effortless beach glam.

Bandanas

Get a bandana. It will deal with horrible hair days so that you don’t have to. Even if you have the best hair in the world, humidity and dirt have immediate consequences. The so-called beach hair is nice for a day or two, but there’s only so much of that crazy volume that you can stand without feeling uncomfortable for the entire trip. So get a headband, bandana, or scrunchy to put it away whenever you want to.

Geo Bandana by Urban Outfitters

Hats

Again, how quick will it dry? I wore two natural fiber hats: one straw Panama hat with a black band, and an all-black floppy sun hat that someone sold me at Chichén Itzá. Sales pitch? You could fold it in any way you wanted and it wouldn’t lose its shape at all.  It worked for me and my bag.

Floppy sun hat

Floppy sun hat


Sombrero by Revolve

Sunglasses

Don’t make this more complicated than it needs to be: bring one pair of sunglasses that works well with everything. If not, bring one pair that works with blacks, one that works with browns, and something that doesn’t really go well with anything but is an outfit in and of itself. A classic pair of Ray Bans will do the trick.

Pack sunglasses that go with anything

Weekend bags

If you’ve never felt the need to find an incredible weekender bag, this is your sign. These are the types of totes or duffles that simply carry it all: clothes, shoes, passports, food. Getting a neutral one makes it much easier to pair with everything else you own. Beige, black, and military green are all great options.

Herschel Supply Co. Market Tote Bag

Ideal Shoes for Tulum (and any other beach trip, really)

Generally speaking, there are only two types of shoes during a beach trip: dirty and clean. That’s all there is. Clean shoes include the sneakers you travel with (to and from) and one pair of heels in case there is somewhere that fancy you need to go to. I found that the best type of heels to bring (if you really, really need to — like I do) are high wedges made with natural fibers. They dry up quickly, look well even with a little sand all over, and generally have great support to walk around the beach. And while we’re at it, here’s another piece of advice from someone who had to walk dozens of streets in DC and then look polished in the office: go for the flip-flops and pack those heels in your handbag.

Splendid Dara Wedges from Revolve

Let’s talk about dirty shoes for a minute. Those are the ones you take to battle with you. They’re the type of shoes you need to be mentally prepared to ruin, because that’ll probably be the case. Flat, open sandals and flip-flops are great choices.

Beauty & Makeup While in Mexico

Here’s something I could probably talk about for days. Your best makeup choice during a beach trip is called H2O. Drink lots and lots and lots of water. More than you would in a couple of days. I have found that drinking cold water is the only way to keep your skin truly hydrated in the middle of all that heat. Aside from that, and only if you want to wear some light makeup, here are my picks.

  • A compact eyeshadow palette that works for day and night looks. Tarte’s Tease Tartelette is a great one to bring.
  • Two lipsticks: one hydrating, everyday tone and one intense, dark shade
  • Your skincare products, including something to exfoliate with, a toner, soap, and a moisturizer. Bring face wipes and carry them with you. You’ll thank me later.

Any other tips of your own?

Feel free to share any other tips or questions in the comments section below.


Magic & Mezcal: My Trip to Tulum

This is the first article in a series of posts where I’ll share my adventures in Tulum, Mexico. I will share the meals, places, and packing recommendations that made this an incredible trip — hopefully they’ll inspire you too!


Our bartender sported a twisted mustache straight out of a Disney film. Magic, he kept repeating. Tulum was magic like he’d never seen before. He said he was here by accident (weren’t we all?) because his original destination was Playa del Carmen. He couldn’t handle it, he said. Not after meeting Tulum. But “don’t get me wrong”, he continued, “Playa is beautiful, but it’s built around tourism”. I pondered on that for a moment. Wasn’t this appeal precisely what so many other beautiful destinations around the world yearned for? Begged for? Sometimes even paid for? All it took was this one sentence: “Tulum makes you want to stay, cuate. I had heard that before. That certain magnetism some cities carry about them. They don’t want you to visit, they’d like to charm you to the point where you have no choice but to stay. They call you “cuate”, “amigo”, “brother”, “llave”, “carnal” — whatever it takes. There’s no limit to the speed with which they become your best friend. These cities. It’s hard to describe, but there are more than a few one-way-ticket cities in this world. I was immediately and irremediably convinced that this was one of them.

c-tulum-photos-164

A quick shot near the Mayan ruins by the beach

He asked if we wanted to try grasshoppers. (Affirmative, as in “would you like to chew some bugs?”). Considering we were well past our fourth Mezcal at this point, hoppers seemed like a somewhat horrible, yet epic idea. Nothing our newly awakened sense of adventure wasn’t willing to bite. Protein, right? Right… that scene still makes me cringe. In an amusing way, nonetheless. Cringe nostalgically?

We were cut short by the sound of chairs being pulled to the side and the sheer brightness of bar lights turning on. You could tell the brick oven was cooling off. The swaying palm leaves I had confused with rain for the last three days were falling asleep. That odd mix of bold Latin club anthems and mellow Californian jams suddenly dimmed. The last tiny bit of my hand-rolled tortilla was swiftly taken away. The bar was about to close, and while I never asked that bartender’s name, I will hold his story as the 15 glorious minutes that helped me understand this quirky town.

Tulum is a gypsy little spot of the Earth where things still happen slowly, and a little magically. The type of oasis of the spirit where you get to fall in love with your thoughts as they fly by. The type of travel destination that takes you on a journey to yourself. We had to agree with him: magical realism competes with nothing.

Tulum, you keep making love out of nothing at all. We’ll keep falling for you.

Old to Bold: Upcycled Victorian Frame

Old to Bold: Upcycled Victorian Frame

May is almost here and it’s time to start coming up with Mother’s Day gift ideas! I went into my mom’s bedroom to find out what she needed and spotted the most awful, old picture frames collecting dust by her bedside table. There was one thing about them, though, that I thought had potential. They had gorgeous victorian textures underneath layers and layers of faux “gold” accents and lacquer… so I set myself to making them shine!

You can find pictures of the whole process and a material list below. Here’s what I came up with:

Frame_Process

1. Remove the back side of each picture frame

2. Mix up some light beige paint. This is aprox. 10 parts white to 1 part yellow. You can also try light blue, pink, or whatever tone you love!

3. Cover each frame with at least 5 coats of paint. Since we’re doing almost white tones over dark surfaces, this might take a while. I included a picture of my frame right after the first coat of paint just so you get an idea of how ugly it still looked.

4. Protect each frame with matte clear spray.

5. Enjoy going from old to bold 🙂

My mom absolutely loved her mini bedside table makeover. Yours will too. I hope you enjoyed this tutorial and if you have any questions feel free to email me at nostalgiosity@gmail.com, comment right here, tweet @nostalgiosity or leave a comment on my wall at www.facebook.com/nostalgiosity.

Nostalchic: DIY Candle Holder

Nostalchic: DIY Candle Holder

I’m so excited to show you this one! I’ve always loved Anthropologie’s curvy, pastel vases with statement flowers, so I decided to try something similar on my own. I bought a glass cylinder for literally $1 and gathered a few inexpensive craft supplies and ended up with a super chic candle/pen holder that makes me smile every time I look. Here’s why: I never thought EVA foam could look chic! Never, ever, ever. Yet, 2 coats of varnish later, here it is 🙂

CandleHolder_Process

I’ll go over my steps:

  1. Draw 3 different petal sizes onto white EVA foam (also known sometimes as “foamy”)
  2. Cut out as many petals of each kind as you need (depending on the size of your flower)
  3. Use a glue gun or UHU glue to join the left & right bottom edges and form a curvy petal shape. I’ll be honest: if you have enough time to wait, do use UHU. Otherwise, you WILL probably get burned a bit with the hot glue. I mean, it’s bad, but that’s the risk you take any time you use a hot glue gun! On the bright side, you’ll save a lot of time 🙂
  4.  Assemble your flower glueing all your petals to an EVA foam circle. When you finish the first row, repeat with the medium sized petals and then the smallest ones.
  5. Protect your finished flower. I used 2 products here: regular white school glue and a high gloss varnish. You can also use epoxy resin (if you know how to mix/apply it) or just a couple more layers of glue.
  6. Get started with your glass container. I love mint, so I mixed 10 parts of white acrylic paint to 1 blue and 1 yellow. Just eyeball it: it’s a white base with a couple of drops of blue and yellow. You can also buy acrylic paint in the specific hue you like. This is useful if you’re planning on painting more than one item. It’ll take a good 4-5 layers to really cover the glass.
  7. Protect your glass container with varnish. In my case, I was going to put a candle inside, so it was extra important to cover it.
  8. Glue your flower onto your container — & you’re done!

I hope you enjoyed this tutorial and if you have any questions feel free to email me at nostalgiosity@gmail.com, comment right here, tweet @nostalgiosity or leave a comment on my wall at www.facebook.com/nostalgiosity.

7 DIY Adorable Retro Headpieces

7 DIY Adorable Retro Headpieces

Summer is about tanning, traveling, smiling, going out on picnics, concerts, parties & just plain fun. But something else comes with summer, something all women dread: BAD HAIR DAYS. You know what I’m talking about. You’re staring in front of the mirror and you can’t believe this frizzy, greasy monster on top of your head. Total mood killer. But no need to worry! Here are 7 ADORABLE DIY retro headpieces that will make you stand out for all the right reasons!

Hope you love them as much as we do!

HeadpiecesDIY

  1. Rosette Hair Wrap, by Kelly Hicks
  2. 50s Style Bowtie Headband, by Liz Stanley at Momtastic
  3. Hair Rosette Tutorial, by You Seriously Made That?
  4. Ribbon Headband, by Milton Fashion
  5. 20s Style Hair Jewelry, right here at Nostalgiosity
  6. Bead Embellished Hair Accessory with Leather Headband, by A Bird’s Leap
  7. 3 DIY Turban Tutorials, by Cotton and Curls

I hope you enjoyed this roundup and if you have any questions feel free to email me at nostalgiosity@gmail.com, comment right here, tweet @nostalgiosity or leave a comment on my wall at www.facebook.com/nostalgiosity.